How to install mods on a Minecraft server (no command line)
Want mods or plugins on your Minecraft server without the command line? Here's the one-click way, and why that plugins folder looks empty.
Adding mods or plugins to a Minecraft server has a reputation: download a file, figure out which folder it goes in, restart from a black command window, then hand-edit a settings file you have to know the name of. It does not have to be like that. On SpawnBox there is a one-click way, and this guide walks it, plus the one thing that trips almost everyone up.
Two ways to do this
There are really two paths to putting a mod or plugin on your server:
- By hand. You find the file yourself, drop it in the right folder, restart the server, and edit its settings file once it appears. It works, but there are a couple of easy ways to get it wrong (we will get to those).
- The one-click way. You search a built-in list inside SpawnBox, click Install, and SpawnBox works out the versions so the whole set runs together. No command line, no hunting for files.
We will show the one-click way first, because it is the one we would point a friend to.
The one-click way (and the part that is genuinely clever)
SpawnBox has a built-in browser for mods, plugins, and datapacks, powered by Modrinth, the community platform where creators publish their work. Search for what you want, click any result to read all about it right in the app (what it does, screenshots, what it needs), and click Install. No downloading files, no hunting across websites.
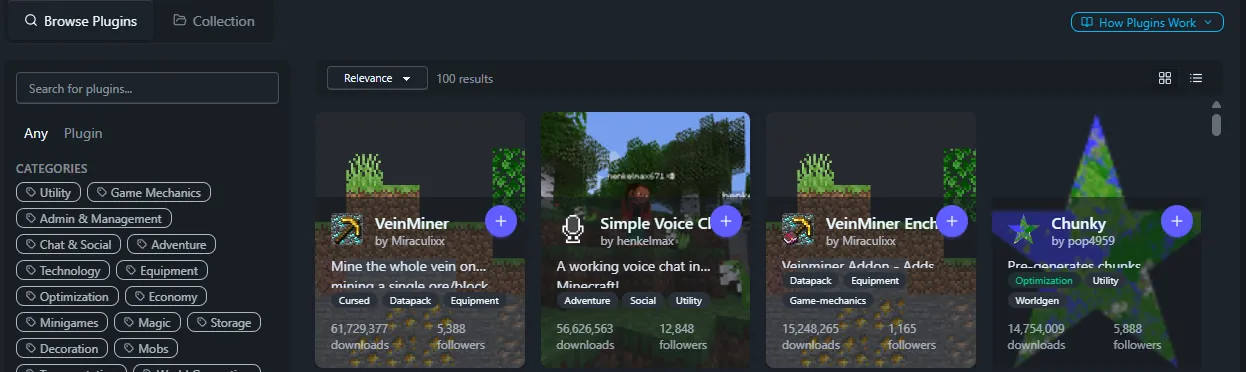
Here is the part that makes it feel effortless. Most tools make you lock in a Minecraft version and loader first, then go scrounging for mods that happen to work with that exact combination, cross-referencing version numbers across a dozen tabs. SpawnBox flips that around: you pick the mods and plugins you want, and it solves which Minecraft version and loader they all work on together, in a single pass. Add something and it automatically pulls in anything that mod depends on, too. You never match a version by hand.
So the whole workflow is just: browse, add the things your group wants, and let SpawnBox work out a combination that actually runs. (It happily works the other way as well, if you already have a version in mind, add mods and it finds the builds that fit it.)
Getting your friends into your modded world
A modded server has one catch a vanilla one does not: your friends need the same mods you do, or they cannot join, and a single mismatched version breaks it for that person. Hand-installing the exact same set on everyone’s computer is the kind of headache that ends modded servers before they even get going.
SpawnBox does that part for you. As you add and change mods, it quietly keeps a matching client modpack ready, the precise set your friends need. When you invite someone, the connection wizard hands you a ready-to-share invite with your server’s address, a Modrinth link, and that modpack file, all together. Your friend opens the file, it sets up their whole Minecraft to match, and drops your server straight into their Multiplayer list, no typed addresses and no version hunting. If you run the Discord bot, it posts the same thing as a pinned card that refreshes itself every time you change your mods.
The thing that trips everyone up: where mods actually live
Here is the one that catches almost everybody, and it is worth understanding even if you only ever use the one-click browser.
SpawnBox runs each of your worlds as its own little server. That is a good thing (one world’s mods can never mess up another’s), but it means each world keeps its own mods and plugins, tucked inside that world’s folder. There is not one shared pile at the top.
So if you go poking around in your files and open the plugins folder at the very top, it
looks empty, and people understandably panic: “there are no plugins in the plugins folder.”
The plugins are not missing. The real folder lives inside the world you are actually
playing (for example your-server\your-world\.appdata\plugins), because that world is its
own server.
If you would rather add files by hand
You can absolutely do it yourself. Two things to know so it goes smoothly:
- Put the file in the world’s folder, not the top. Drop mods and plugins into the folder
for the world you are playing (the per-world
modsorpluginsfolder above), not a folder at the very top level. - SpawnBox tidies up, it does not delete. If a mod ends up dropping a folder at the top by mistake, SpawnBox moves it into the right place for your world the next time the server starts. Your files are safe - it just sorts them where they belong. (If it ever finds the same thing in two places, it stops and tells you rather than guessing, so nothing gets quietly overwritten.)
Even by hand, the built-in browser is the easier road, because it skips the “which folder, which version” guessing entirely.
Changing a mod’s settings, without touching a file
Two things worth knowing here, and the second is the good part.
First, a mod or plugin’s settings do not exist until the server has run once with it installed. That is how Minecraft works everywhere, not a SpawnBox quirk. So the order is: install it, start the server once so it creates its settings, then change what you like. If you go looking before that first start, the settings simply are not there yet.
Second, when you go to change them, you do not go hunting through folders. For anything you installed through the browser, SpawnBox puts a small settings cog right next to the mod in your list. Click it and SpawnBox finds that mod’s settings files for you and lays them out as a plain form, with friendly labels and boxes instead of a wall of raw text. Change what you want, hit Save, and restart the server if the mod asks for it. (There is an Advanced view if you ever want to see the raw file, but most people never open it.)
”It installed but it is not working”
Sometimes a plugin installs fine but shows up in-game as “not running any plugin by that name,” or just does nothing. Almost always, this is a version mismatch: the plugin was built for a different Minecraft (or Java) version than your server is running, so your server sees the file but cannot load it.
The built-in browser avoids this entirely, because it solves the versions for you. If you added something by hand and hit this, grab the build of the mod or plugin that lists your Minecraft version, put only that one file in the folder, and do a full stop-and-start (not just a reload) so the server picks it up cleanly.
That is it
Adding mods and plugins does not need the command line, and it does not need you to memorize where files live. Use the built-in browser for the easy path; if you go by hand, drop files in the world’s own folder and start once before you configure.
New to all this? Our step-by-step Windows setup guide gets a server running first, and if friends have trouble connecting once your mods are in, our free fix for tricky internet covers the usual causes.